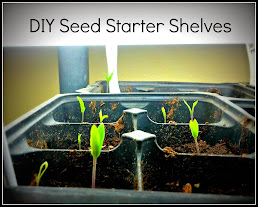
DIY Seed Starter Shelves


Two years ago I began starting my vegetable plants by seed. This has significantly cut my gardening costs even while increasing the number of plants each year, so there is no going back to buying seedlings from the home and garden center.

This first year I kept the seed trays outside. I kept them on the shelves of some old rolling TV carts (the ones they used in public schools when I was little) and I rolled them into the sun each morning and back under the carport each night. We live in Louisiana and we had an unusually mild winter, so most of the seedlings did okay. 

Last year I decided to keep them all inside as it was an unusually cold winter. It was an impromptu set up to say the least. I put a vinyl tablecloth over the dining room table and covered the whole thing with six packs in flood trays to catch the water. Then I positioned every lamp in the house between the flood trays to get as much light to them as possible. After not using the dining room or any lamps for two months, we had a little better success with the seedlings, but still not phenomenal. 

This year I decided to bite the bullet and invest the money in actually build a seed starting system that gives the seeds everything they need for the strongest start possible. I look forward to seeing how this new set up affects the yields once the vegetables start coming in. 

All things considered it wasn't a very expensive endeavor. I used some plastic stackable shelves that I had in the greenhouse, so the frame was already there. If you don't have shelves already and don't want to buy a new set, you can always create a custom frame out of 2x4's. Since this is going in the spare room that has carpet, I put down a vinyl tablecloth for easy clean up in case there are any leaks.


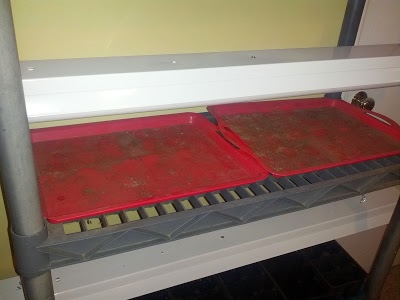
I then bought three hanging fluorescent work light fixtures for $12 a piece and six daylight fluorescent bulbs for $5 a piece. The fixtures already came with chains, but I had to add S hooks. Instead of running back to the hardware store, I just made my own out of a metal clothes hanger. I hung the lights as low as they will go to start off with and plugged them all in to a power strip so that I can turn them all on and off at the same time. Now all I need are the plants!


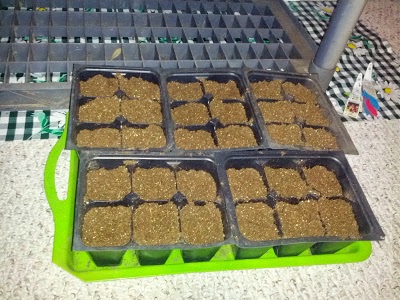
I bought these barbeque trays from the dollar store last year to use as flood trays, and they work great, especially for the price! I can fit 5 six packs on each one, and this allows me to water the plants from the bottom rather than the top.


I used seed starting mix to put in the six packs. The Jiffy Organic is awesome and not very expensive (about $5 per bag). For the six packs, I used some old ones that I had kept from last year and disinfected them.

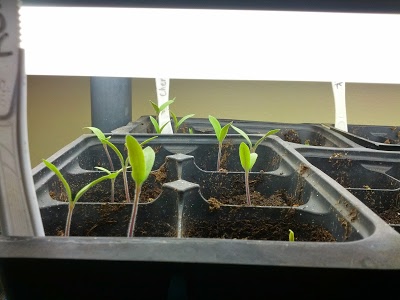
Lower the lights all the way so that they are close to the plants! And I'm not sure if you can see in the picture, but I label each six pack with a plastic knife and a Sharpie. For some reason I always have the knives left in those mixed boxes of plastic utensils and they work perfect for this!


This set up has worked so amazingly, I just have to share the progress! I will show you the progress of just one of the six packs to give you an idea- I planted the Roma tomato seeds on Jan. 10, and the first ones sprouted after only 6 days. Here is the growth over the first few weeks.

Jan. 18

Jan. 19

Jan. 21

Jan. 28

By Jan. 31 I had to transplant them into 4 inch pots after only 3 weeks! At this point, I am hoping the weather warms up soon or I'm afraid I'll have a full container garden inside my house! 

Vegetable Starting Guide: Seeds or Plants?


So you're ready to begin a vegetable garden or try a new plant for the first time, but you aren't sure how to begin. Start seed indoors, direct sow, or buy transplants?

After years of experimenting with seeds and transplants, I have decided to make a handy chart to keep track of the vegetables that start out better with seeds started indoors, seeds directly sown in the ground, or bought from the store in a pot. Here is a little bit more on each of the options.

Direct Sow
I used to be completely intimidated by starting seeds directly in the ground. I'm way to much of a control freak to believe that sticking a seed in some dirt outside and walking away could ever produce anything edible, but after lots of trusting and trying, it has become one of the easiest (and cheapest) ways that I have found to begin most vegetables. Without direct sowing in the garden, you will greatly limit the number of different vegetable types that you can grow. It is much easier than you think, and at $1 per pack for most seed, the price is unbeatable for gardening on any larger scale.

All varieties of beans are a great seed to start with if direct sowing intimidates you. These seeds will come up fast and grow strong every time!


Seeds Started Indoors
Some plants need the extra time to grow before the weather warms up enough to go outside, especially in areas of the country with short growing seasons. Starting seeds indoors is a great way to give those plants a jump start. Simply plant your seeds in six packs or peat pots with potting soil. Some gardeners use a soil-less seed starting mix, but I find that a good potting soil almost always does the trick. Keep the soil moist, (the best way is by watering from the bottom) and keep them under LOTS of light. You don't want your seedlings to get long and lanky stretching for sunlight. Put them out in the sun as soon as possible.

Transplants
Some plants simply take too long to grow from seed to maturity in a single planting season, especially in colder zones where the growing season is short. There are also some plants that can be grown from seed, but with the amount of care and attention they need, it is just not worth it. In those cases, you will want to buy plants from your local nursery. When choosing plants, buy the smallest ones possible to keep your budget under control. Don't worry, they will be big soon! Look for plants that are low and bushy rather than tall and lanky.

Other
Other vegetables have special beginnings, such as potatoes, onions, garlic, and asparagus. They may be started from bulbs, seed potatoes, slips, leftovers from the kitchen, mature root stock, or sets that you buy from the store or order from a catalog. Do some research on these individual plants to find the best way to get the growing.


Sweet potatoes are grown from slips started from a seed potato.

And now for the handy chart! I hope this helps you as you expand your gardening horizons and try new plants. Some plants may have links that you can click on for more information on starting that particular plant.


Download: click here