My Top 18 flowers for spring in the South

With the summer heat really rising, I wanted to take a moment to look back on some of my favorite flowers from the spring. Here are my top picks from my yard. The best of spring in South Louisiana!

#1) Apostle's Creed

Love these! They are called Apostle's Creed or Twelve Apostle plants. Each bloom lasts only a day, but where they fall to the ground, they sprout a new plant :) They bring a nice bloom to a shady spot and are super hardy. Definitely a top favorite.

#2) Petunias

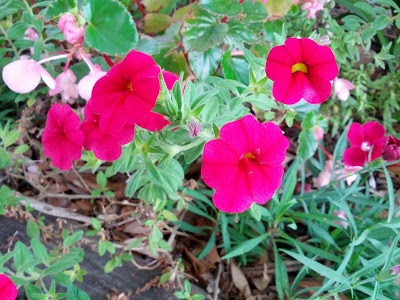
This is a pretty commonplace flower in the south- Petunias. Reliable bloomers, and lots of colors to choose from. You can't go wrong. And the white flowers behind them (in the pic on the left) is what my mom calls a "wishbone" plant- not sure of the technical name, but it blooms constantly from spring through fall and reseeds each year if the ground goes undisturbed.

#3) Louisiana Iris

Louisiana Iris, obviously a good choice for south Louisiana. Mine have been growing from baby transplants, so this was their first year to bloom. Well worth the wait!

#4) Dianthus

This photo has a combination of Petunias, "wishbone" flowers, Vincas, and Dianthus. The Dianthus are a must have in any southern garden. In the warm temperatures they are perennials. I bought some three years ago- they have never stopped blooming, have continued to grow in size, and even propagated new plants. This is the perfect touch of year round color!

#5) Gaillardia

Gaillardia comes in several varieties- two of them are shown here. I started with a few plants a couple of years ago, and as fast as the old ones die off, new ones reseed around it. They bloom year round and add a brilliant splash of color.

#6) Canna Lily

Canna Lillies come in many colors, but the brilliant white is my personal favorite. It completely dies down in winter, but it makes up for lost time in the spring with huge gorgeous flowers.

#7) Black Eye Susan

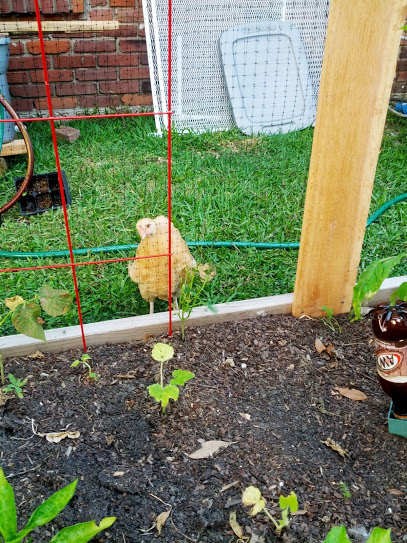
Another perennial that readily reseeds and blooms spring through fall is Black Eye Susan's. I started with one plant grown from seed and now have a garden full! (Bonus question: Can you spot the chicken? My chickens all come running when I pull out the camera...)

#8) Roses

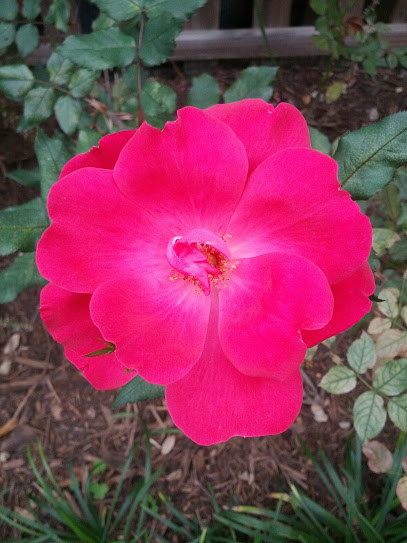
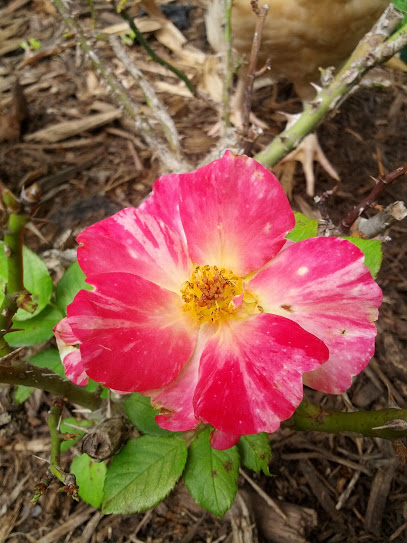
On the left is a bloom from my climbing rose. (Can you spot the chicken now?) And on the right is a bloom from the knock out roses. Knock-out roses are the best plants ever! One plant gets huge and blooms consistently almost year round. Prune it to whatever size you want it to be. Super low maintenance and still has all of the beauty of a rose.

#9) Coreopsis

Coreopsis is another plant I started from seed that didn't die down last winter and have multiplied in the garden. There are two varieties shown here- one with a few large yellow flowers and the other (a wildflower variety) that has literally hundreds of little flowers with brown centers. Both varieties love my yard. (How about the chicken in this one?)
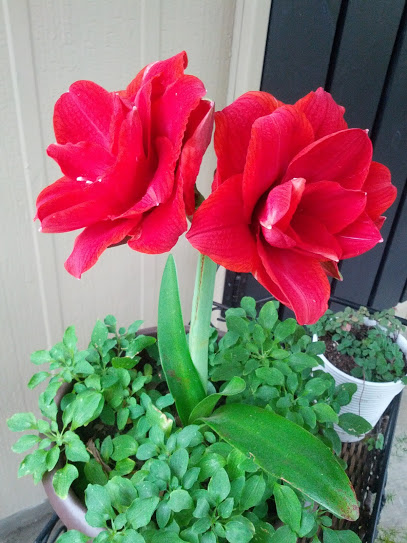
#10) Amaryllis

Amaryllis blooms are just breath-taking. They are bulbs so you just stick them in the ground and forget about them until this bloom the size of your head comes up in spring and makes all the neighbors stop and gaze :)

#11) Tulips

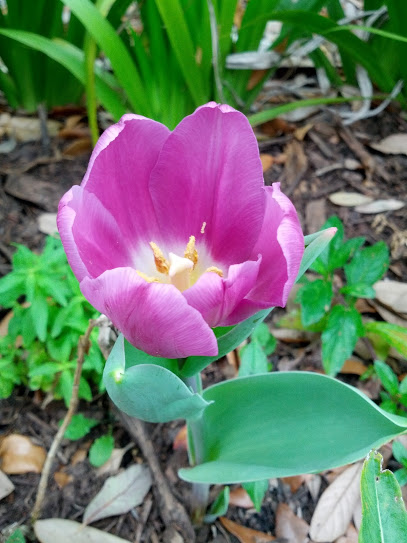
Tulips are another easy bulb to grow are Tulips. The comes in so many colors and varieties! The only problem is that they only bloom once and they aren't the cheapest bulb to buy, so I use them sparingly.

#12) Daffodils

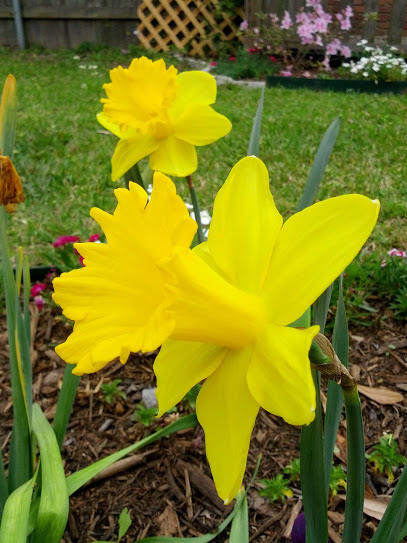
Daffodils are one of the happiest flowers in the garden :) They bloom year after year, and who can resist this bright and smiling flower in spring???

#13) Agapanthus

Agapanthus or Lily of the Nile is a perennial that stays green and leafy year round and sends up these beautiful bunches of blossoms in the spring. I started these from baby transplants, so this is the first year that they bloomed for me. No maintenance at all!

#14)Sparaxis

I planted these bulbs last year and nothing. I thought they had rotted or just didn't like where I had put them, but this year they all came up in bunches and gave off a huge show of blooms. I immediately bought more and planted them...and nothing. I guess I'll wait until next year to see about those!

#15) Gardenias

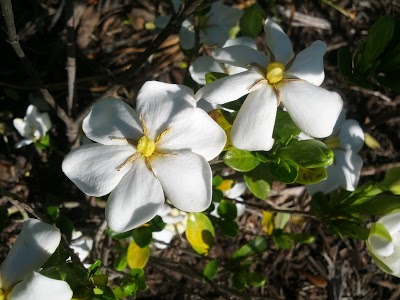
Gardenias seem to personify the south- delicate, fragile, and sweet. I have two different varieties, and love them both. I can tell they are blooming before I see the flowers because the whole yard smells like honey! Another good flowering plant for shady spots.

#16) Azaleas

Sadly, I somehow ended up with no pictures of my azaleas this year! Azaleas are beautiful flowering shrubs. They may only bloom a few weeks out of the year, but it is definitely worth the wait with so many blooms you can't even see the leaves!

#17) Fruit trees

I know this isn't your typical garden flower, but I love seeing all of my fruit trees bloom in the spring because it means delicious edibles in late summer and fall. The in the picture is a satsuma- a citrus fruit unique to Louisiana. I have lemon, grapefruit, satsuma, blood orange, kumquat, apple, pear, mulberry, blueberry and pomegranate. Seeing these blooms always brings a smile to my face and makes my mouth water :)

#18) Best for last- Double Ruffle Amaryllis

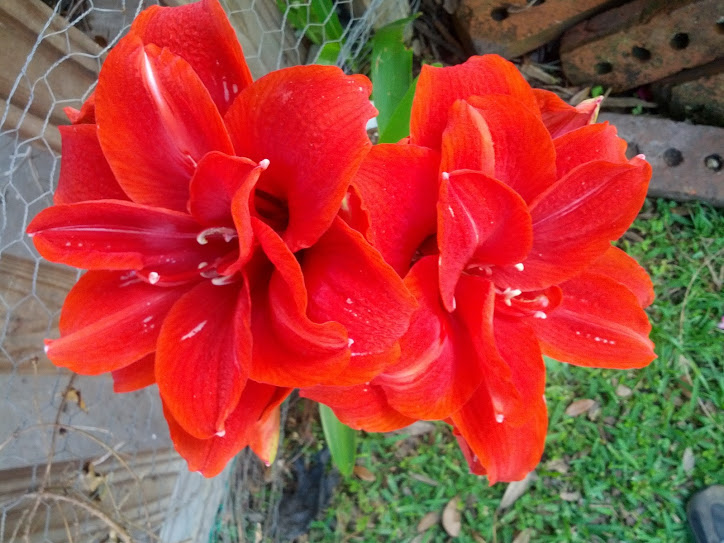
I absolutely love my double ruffle Amaryllis plants. Each plant blooms multiple times a year with multiple blooms per stalk, and each bloom is easily 12 inches across. The double ruffle is just breathtaking, and it makes a wonderful cut flower. A friend gave me these, so I have no idea where to get more, but every time I get to divide them I get so excited to add another to my collection. God had fun making this one :)

These are just a few of my tried and true favorites. What are yours?


Baby Birds!


A few weeks ago I found a delightful little garden surprise. There was a wren's nest built in the top of the weed eater in my shed, along with five little speckled eggs! After watching and waiting (almost as attentively as the mother) I finally heard the little cheep-cheep of the babies last week. Here is a picture of the babies on the day that they hatched.


All head with big closed eyes and wide beaks! A funny way to start out :)

After about a week, they are growing quickly, already growing little feathers and looking around. They are keeping mom busy with their constant demands for food!


 What fun to watch this amazing process! Now I just have to wait until they learn to fly so DH can weed eat the yard again, lol :)

And then there were eleven!

We had originally wanted only 4-5 chickens in our backyard, but everyone said to buy more than we want in a flock because not all the chicks will make it to adulthood and it is difficult to introduce a single new chick to an established flock. That is how we ended up with seven chicks about 5 weeks ago, and I have loved having the bigger than intended flock. Click here to read about their beginning weeks.

About three weeks ago when we came home from work there were only six. There was no sign of feathers or a struggle, and the other chickens were not disturbed or skittish in the least. We looked around the neighborhood and waited, but the whereabouts of our lost chicken will remain a mystery. And then there six.


My flock has grown quickly in the last few weeks and are almost full-grown. The fear of losing another chicken had passed, but last Friday one of them found a hole under the fence and went to play with the dog next door. Dogs play a little rough with chickens. And then there were five.


Even though we now had the number that we had wanted in the first place, five just wasn't enough for us anymore. Somehow this weekend we found ourselves coming home from the feed store with 6 new week-old Americauna chicks to add to our little flock of Buff Orpingtons. And then there were eleven! 
(I couldn't be more excited!)


They are so cute, but definitely more skittish than our first groups of chicks. I'm interested to see how well this group mixes with our flock that has grown up together. So far the Orpingtons are being polite, but don't want much to do with them. Does anyone have experience with mixing flocks of different ages? I hope they all get along!


How to Chicken Proof a Vegetable Garden

I love my vegetable garden, but unfortunately, so do the backyard chickens. After discovering that several of my favorite plants were also my chickens' favorites, I knew something had to give.

They ate all the leaves off of the soybeans and squished my squash plants....

took a good chunk out of my lettuce and kale...

and ate all the leaves off of my bush beans.

Not okay.

For a temporary fix I used all of the fencing and metal edging that I could find to keep them out. It worked for a while, but is definitely not a look I want to continue.

After looking into several options, i decided to go with this deer netting from Home Depot. I was able to order it online and they delivered it to my local store with no additional S&H. A $20 fix? Yes, please!

I cut some fence boards in half to make three foot long posts. Then I nailed them into the inside of the raised bed to create a frame.

The netting is 7 feet high so I doubled it over before connecting it to the frame. I wanted to still be able to access the garden, so I decided to make a separate section of removable netting between each of the framing posts. To do this I put a nail on each side of each piece of framing at the top, leaving the head sticking out about a quarter of an inch. I attached loops to the edge of the netting and hooked it over the head of the nails.

I repeated the same thing at the bottom of each piece of framing to keep the base taut. I made sure to overlap the edges by a few inches to leave no openings.

Now when I want to have access to the garden, I simply unhook the loops for that section and pull back the netting. And I can easily replace it when I am done.

I need to watch how close the plants are to the edge, though. This hen is giving me her innocent eyes after eating a few leaves of a bush bean plant growing too close to the netting. "Who me?" she asks.

 The finished product turned out a lot better than I thought. It doesn't block sunlight from the plants, can be easily removed for garden access, it keeps out any critters, and it is hardly even noticeable!

And now the chickens and I are back to a happy co-existence :)

How To: Starting a Raised Vegetable Garden

I decided to extend my vegetable garden last week, so I thought I would take the opportunity to make a quick how-to on putting one together. Starting a raised vegetable garden is pretty simple.

Why make a raised garden?

1. You can get great drainage for the soil, especially good for me in south louisiana where we have swampy ground.

2. You can start your garden off with great dirt rather than slowly building up the natural soil over several years.

3. The weeding is slim to none! (That's a good enough reason right there!)

First, lay out the dimensions of the garden. My extension will be 5 feet by 5 feet. You don't want to make it wider that 5 feet, otherwise you won't be able to reach the plants in the middle unless you make rows, but those waste too much space in a small backyard garden. Once you have decided on the size, mark out the area on the ground and use a flat shovel to dig up the grass.

This really is the hardest part. Digging up grass is no fun and a lot of work, but it has to be done, so just think about all those tasty homegrown vegetables and do it! I have discovered that the easiest way is to dig the shovel in a few inches deep around the whole perimeter and then do the same thing in one foot wide lines across the inside, then peel up each one foot wide section in rows.

If you use this method, the grass should come up in pretty nice chunks of sod that you can then reuse in low or dead spots in the yard.

Give yourself plenty of time and breaks for water, but if you stick with it, sooner or later all of the grass will be gone!

Next, use boards to frame the outside and screw them together at the corners. I use 2x6 treated pine boards cut to the length that I need. Some people say not to use treated wood when planting food, but treated wood is not the extremely toxic stuff that it used to be a few decades ago, so I use it. If it really bothers you, pay the extra money to use untreated cedar. Just regular untreated boards will rot in no time.

If you want to really keep the weeds and grass from growing back, you can line the bottom of the bed with weed fabric. I have noticed that this keeps some of the plants from growing deep roots and producing as well, so I opt for lining the bottom with a layer of cardboard. It kills any remaining weeds or grass and decomposes after about 18 months. I layer my compost and leaves on top on the cardboard, then bagged rich soil, and finally finish it off with top soil. Be sure to fill your raised bed to the top for the best growing conditions. Now all you need are some plants :)

DIY Plant Markers

DIY Plant Markers for the Garden

I was looking for a way to marks the rows in my vegetable garden that was colorful but not cheesy and wouldn't constantly get blown over. This is so easy, and it came out better than I expected.

What you need:

- River rocks

- Acrylic paint

- Paintbrush

- Colored Sharpies

- Exterior ModPodge

- Krylon clear acrylic coating spray

First paint a background on one side of the rock with acrylic paint. 

Then write the name of the plant in Sharpie.

Finally, paint on three coats of Outdoor ModPodge to seal it from the weather, spray with the Krylon clear coat to keep the ModPodge from getting gummy, and you're done!

An easy and beautiful garden craft idea, just in time for Mother's Day!

Delightful little garden surprise

One of the things that I love most about playing in the garden is the delightful little unexpected surprises that come my way, sometimes even out of a former "mistake". Our shed has been settling unevenly and the doors no longer close all the way. The project is not at the top of the list, so it has stayed that way for several months.

This morning when I went in to get chicken wire (to fix an issue with the chickens' great escape- a story for another day...) a little red bird flew out of the shed just inches away from where I was reaching. I looked inside the roll of chicken wire and didn't see anything, but as I pulled it out, I saw that the birds had built a nest just beneath in the cover of the weed eater of all places!

Here is the nest all cozy in the top to the weedeater.

A closer look at this little bird's handiwork. 

When I peeked inside, guess what??? Five tiny speckled eggs! I hope the mother doesn't feel too intruded upon to finished her egg hatching. What a fun day in the garden!


There are little miracles all around us every day if we stop to take the time to appreciate them :)

To read the rest of the story, click here.

In the beginning...

I love starting projects, and I seem to always be in the middle of creating something new, especially in the yard. All of these projects start with LOTS of internet research, and after getting a lot of good tips from bloggers and forums, I can't help but begin my own! Maybe someone can gather a bit of helpful information from it, or I can at least look back to learn from my own mistakes along the way :)

One of my newest endeavors is backyard chickens!


Here is our little flock of seven Buff Orpingtons. This is their first day with us, and they are about two weeks old. They are so soft and sweet!


The chickens have to stay indoors for a few weeks or until the weather gets warm enough for them to handle it. They are supposed to stay in their box, but we have several who are much too social for that!


Having smelly chickens in the house was a great motivator for us to finish the coop as soon as possible. But once we moved the chickens out, they missed being inside with us. Our parrot, however, was very happy to have the house back to himself.


Now that the chickens are out of the house, they love to free range in the backyard, especially the mulched gardens.

A few observations as a new chicken owner:
1. They are SO low maintenance! I open the chicken coop door in the morning, let them free range in the yard all day, and then at dusk they go back into the coop on their own. I count their fuzzy heads and close the door for the night. I check to make sure their food and water containers are filled, and that's it!

2. They have personalities. My chickens are very social, have distinct characteristics, and are always up to the funniest antics. They follow my husband and I around the yard, and come when called (unless distracted). I was not expecting such fun from a bunch of chickens!

3. They like to eat garden plants. This was a disappointing discovery. I love to garden and spend a lot of time working with my flowers and vegetables, so I was horrified to see that they had eaten every green leaf off of my kiwi vines and strawberry plants, not to mention eating portions of my lettuce, kale, dahlias, jasmine, and others. They also like to take dust baths in the mulch, which means mulch gets flung everywhere! This also causes a problem with direct sown seeds as they get dug up and flung out of the beds as well. I would fuss at them, but they are just too cute! I have a feeling I will be a terrible mother one day...

4. They eat like pigs! They eat everything in sight! Bugs, plants, leftover food, you name it. They are constantly pecking, tasting, devouring. Maybe they will slow down once they have finished growing, but at this rate they are eating us out of house and home!

To read more about this flock, click here.